Saturday, February 28, 2009

Happy Weekend Everyone!

Hope you’re  having a great weekend.  I LOVE weekends.  I usually play catch-up on weekends; the interruptions are fewer.   How about you?  Do you get to do some quilting or something fun?

I’m excited this weekend because my grand-daughters are coming for a sleepover!

I’ve got a simple embroidery project planned for them.  This will be their first, and  I hope they love it!  It’s a little hard to teach two at once, especially when one has a shorter attention span, but I’m going to give it a try.  Puppy-opoly

Later tonight, after a nutritious pizza dinner, you’ll find us all at the kitchen table playing Puppy-opoly!  Doesn’t this look like a kick?

Moda FabricsFor those you have been asking for the same fabrics I’ve used in my Tisket a Tasket block of the month a few layer cakes have arrived.  I’ve added the Beach House and Aviary layer cakes to my web site under fabrics.  You’ll need one of each.  I’ll have the border fabrics later on. 

Here’s a little tip that might help in choosing your  fabrics.  I selected the 12 basket fabrics and “auditioned” them on a piece of paper.  I cut little squares of each, taped them to the page with double-stick tape, and then changed and moved any I didn’t like.  You can see my sketch pad peeking out in the photo above,  just enough so you get the idea.  This is a great way to make sure the fabrics you choose will work together. 

Have a great weekend everyone! 

Hugs,

Tuesday, February 24, 2009

I never noticed that before!

I have a lot of “stuff” in my studio, I admit it.  I try my best to keep it organized, but sometimes when I’m working away on a project it can get a bit “cluttered”.  So you might not notice if I bought a small little treasure.  But, if I added a bookshelf full of books, cleverly filled the little indented area on top with buttons, and then arranged little displays on the top of the shelf, don’t you think someone would notice?  No!  Not one Bunny Hill helper has noticed! 

It’s the funniest thing!  It sits at the end of the day bed and they all walk by it every time they’re here!  Nancy sits diagonally across from it while she works at the computer. 

Bookcase

Bookcase closeup

Six months from now one of them might say, “oh, when did you get that bookshelf?”  Funny how they notice if there’s a new package of fabric in the studio! 

I think a “notice the bookshelf” party is called for. Three bunny helpers are invited. 

Hugs,

Saturday, February 21, 2009

The Sweetest Bunny!

She was born in Germany and traveled to Paris at an early age.  Paris is where my friend Chickie found her.  From Paris she flew to the United States with Chickie, and then home to me.  She’s a well traveled Bunny and she speaks German and French!

Chickie Bunny Isn’t she the cutest fluff of gray and white fur you’ve ever seen?  I adore this little bunny.  I’m naming her Abby.  Must be those puffy little cheeks and little pink ears that give her so much charm.  Or maybe it ‘s her “international” flair.  She’ll have a place right next to my computer ( aka Brittney). 

DSC_4471

Chelsea looks a little worried don’t you think?  She’s thinking about saving up for RosettaStone.  She thinks she can learn French in 6 weeks.   German many take her a little longer.  Silly dog. 


Thank you Chickie!  The bunny has a good home.    


Hugs,

Friday, February 20, 2009

What a surprise!

Friends were asking me last week if I was doing anything special for Valentines day. Ha! I laughed. I’m so busy right now I’m thinking Quilt market not Valentines. I forgot the rule of life; when you’re not expecting it, that’s when the really special things happen.

Valentine gift

This gold charm bracelet was delivered to my studio by my sweet, sweet husband Ross. It’s even more special when I tell you the story behind it; two years ago he lost my gold charm bracelet with all the charms, when we were moving. It’s never been found and believe me we’ve looked everywhere. I’d given up on ever seeing it again. I thought he might have put it on top of the car while packing, forgot, and drove off. He’s done things like that before.

This Valentine’s day he replaced the bracelet! I was so surprised I just couldn’t believe it! Isn’t that the sweetest thing?

Tomorrow I’ll show you what my friend Chickie just gave me. Here’s a hint; it’s about 3 inches tall, furry, gray and white and well traveled! I happen to love them.

Hugs,

Wednesday, February 18, 2009

Embroidery 101, Part Two

Here we go, we’re on our way to stitching together!

Make a little practice piece to try the stem and backstitch with different types of threads.

Cut a scrap of cotton for the background fabric. Cut a piece of flannel or fusible interfacing the same size. (I cut my flannel a tiny bit larger so you could see it in the photo below). Flannel backing Trace a few hearts (see block two of A Tisket, A Tasket) using a Pigma 01 pen or a fabric pencil. Place the design right side up on top of the flannel or interfacing. (Choose either flannel OR interfacing…don’t use both at the same time.) If you’re using fusible interfacing, now is the time to iron it to the wrong side of your background.

Put your sampler into a hoop and you’re ready to practice stitching.

Now let’s pick some thread!

Floss

I use DMC embroidery floss or Weeks Dye Works floss, two strands. Some designs call for 2 strands and some call for 3 strands of floss. It’s a combination of personal preference, the stitch being used, background fabric and the floss.

When I outline with a back stitch I like the look of three strands. Try it on your sampler and see what you like best!

DMC Floss

Pearl Cotton

I love Valdani pearl cotton and I use size 12 for most of my stitching, but try the Valdani size 8 on a back stitch. You may love the look!

The higher the number the thinner the thread will be. Size 12 is thinner than size 8.

Here’s where it gets a little confusing…Valdani is a thicker thread than DMC. In the picture below DMC is on the left and Valdani is on the right, both size 8.

Valdani size 12 is about the same as DMC size 8. If a pattern calls for Valdani/12 you can substitute with a DMC/8, Valdani/8, substitute DMC /5. DMC size 12 is a thin pearl cotton, beautiful for fine embroidery. Pearl cotton

Stem or Outline stitch

This is my favorite stitch and I use it for almost everything. I love the way it gracefully twists, and fills in a line. There are a few secrets to getting this “graceful” stitch.

Stem stitch

Use two strands of embroidery floss. The first stitch is a little different from the rest: Start at the beginning of a line and work from left to right. Come up at the start and go down 1/4” away coming up in-between where you came up and went down. Always keep your thread below the needle as shown in the diagram above.

Stem Stitch 1 Stem stitch 2 Stem Stitch 3

Look carefully at the stem stitch diagram above. Most people make the mistake of going down directly on the traced line. Instead, go down next to the line and come up next to your last stitch, on the other side of the line. You are following the line, but never actually “on” the line. The stem stitch is always done at an angle.

Stem Stitch Pearl Cotton-1

Make the stitches 1/8” in size. If your stitches are too large you’ll have trouble on the curves following the line. Keep the stitches tiny and consistent. If you can sew with 1/4” seam you can embroider with 1/8” stitch!

Back Stitch

Backstitch

The backstitch is my second favorite stitch. Try this stitch with two and then three strands of floss. Work from right to left, following diagram above.

Start your backstitch as shown in the picture below. Come up 1/8” from the start of the line. Go down at the start and come up again 1/8” from where you first came up.

Backstitch step one

Keep your stitches between 1/8” and 1/4” long. The length of the stitch depends on the floss or pearl cotton you’ve selected. As a general rule I keep my backstitch just a bit over 1/8”.

If you master the stem and backstitch you’ll be on your way to many happy hours of embroidery. It’s so much fun!

I’ll join you in front of the TV!

Hugs,

Tuesday, February 10, 2009

Embroidery 101, Part One

“Rabbits Prefer Embroidery” is back from the quilter! Now its binding time, and then off to the photographer. Before too long we will have a new pattern available!

If you’re new to embroidery, I’ll share a few tips with you over the next few posts. I hope to get you started on the road to embroidery heaven. Yes, there is such a place… you’ll find it in front of the TV every evening. Just sit down, relax, and embroider away on your favorite project.

Valdani

Supplies & Basics:

  1. Embroidery floss or pearl cotton; there are so many wonderful choices on the market! Pick and choose from some or all! DMC, Valdani, Weeks Dye Works, and Lecien just to name a few.
  2. Small sharp scissors
  3. Embroidery needles of assorted sizes
  4. Embroidery hoop: size 5 is all purpose
  5. Backing
  6. Pigma pen, water erasable marker or fabric pencil

Embroidery Floss:

Hold the skein of floss in one hand and shake the floss to release the cut end. Pull this end of the floss and cut off about 18 to 20”of floss .

DSC_4399

Now separate the strands of floss, one thread at a time. Grab one strand of floss and pull it up, straightening the remaining floss as you pull. Repeat for the number of threads you need. Do not try to pull off two or three threads at one time. Oh what a mess you’ll have!

Embroidery Needles:

Embroidery needles have a larger eye than regular sewing needles. The smaller the number the larger the eye (and the longer the needle).

I prefer a short needle for stitching and use a size 10 for most of my work. The short needle gives me more control and makes it easier to sew tiny stitches. If I’m using a pearl cotton or more than two strands of floss I’ll switch to a size 6, 7, or 8 embroidery needle.

Markers: What’s up with all these?

DSC_4406

Pigma Permanent Pen, size 01, makes a fine line that is easy to cover with stitching. It’s the pen most embroidery patterns call for. But keep in mind that the pen mark is permanent. If you make a mistake, or go out of the line, you can’t go back and change it.

Clover water erasable pen; Such a bad rap this marker has, but I use it to mark a lot of my embroidery. The secret to using this pen? Use only the Clover eraser pen to remove the marks and not water.

Fabric pencil; fabric pencils glide easily over the fabric and do not “grab” the fabric like a regular pencil. Most fabric pencils can be erased with a fabric pencil eraser. I suggest not trying to use water to erase the marks, as most products claim you can. I found the results disappointing.

Backing Stabilizer:

Backing hides the thread tails and gives the embroidery more stability. It is not a necessity, but most embroidery patterns call for it. I choose from two types depending on the look I want;

Lightweight fusible interfacing; Gives the embroidery fabric more stability and makes it easier to get an even tension. Cut the interfacing the same size as the background fabric. Trace design onto the background fabric and then iron the interfacing to wrong side of the background.

Lightweight flannel; gives the embroidery a slightly softer look. It’s the backing I used for “Rabbits Prefer Embroidery”. Treat the backing and embroidery fabric as one when you are piecing together your quilt as shown in the photo below.

Back of quilt

Hoop:

To hoop or not to hoop! No groaning allowed. Remember, hoops have been around for YEARS and do have a purpose! Hoops keep the fabric taunt and make it easier to control the tension. The thinner the background fabric the more necessary the hoop becomes. A simple 5” plastic hoop will probably be all you need.

When I use a flannel backing I only use a hoop when I come to an area where I need a lot of control.

Are you ready to do some stitching? I’ll be back with a few tips on that too!

Hugs,

Saturday, February 7, 2009

Treats

In the mail came something so unexpected! Carrie of Miss Rosie fame, sent me the sweetest pink shopping bag along with pink little notebooks. She said she thought of me when she saw the pink! You can bet these will be going to market with me and now I'll have to buy something pink to wear! Darn. That's so hard for me to do! Thanks Carrie! Chelsea sends her love to Miss Rosie ( :


Then yesterday, Anne of Cottons n' Wool fame, met me for lunch and shopping. She's in the area visiting her mom, so we got to spend some time together. HomeGoods was the place to be seen and the store was filled with bunnies. The Easter kind! I fell in love with this guy. He's so gentle and kind looking...


...And he's all glittery! He found a good home at Bunny Hill.


And look at what I found to hold my business cards at Spring quilt market! A bunny pushing a carrot car! He's glittery too!


Then when I got home this little guy was waiting for me. He's my latest eBay purchase. A Fitz and Floyd bunny pitcher.


Yes, you could say my day was perfect. Bunny days are just the best!


And a BIG thank you to all who waited so patiently for my web site to catch up with you on Thursday. C R A W L I N G is too fast of a word to describe what was happening. If you had dial up you must have wanted to kill me. And to think we have 10 months left to go. On the 5th of each month the Bunny Hill web site might have a melt down so please keep trying. Some of you got on fine and others waited 3 hours or more.


If anyone knows how to add a pdf file to blogger please email me! It would help so much if you could download the files from here!


Look at the very first version of block # 2 to arrive in my mail box! Trelly lives in Spain and they are about 9 hours ahead of us, so she was sewing while the rest of us were sleeping! She had this darling block done before I even got up! Isn't it cute? Her block was in my email as soon as I got up on Friday morning!


Be sure and check out my flickr group. I can't believe all the blocks that are posted already! It's so much fun seeing all the different versions!


Have a great weekend!


Hugs,

Thursday, February 5, 2009

It's Basket and Embroidery Day!

A Tisket, A Tasket it's time for our next basket! I've been crazed with how to get everything to post at the same time; newsletter, blog, web site and flickr group.


I finally came to this conclusion. Forget it! I don't have a Moncia, Happy Zombie super talented computer person in my pocket, so I give up. Chelsea's the only one here right now. She has her jammies on and wants to go to bed. Tee Hee! So I set this post to magically appear at midnight PST and if you're reading this now, it worked! Author has added this comment: Chelsea forgot to hit publish so you'll be reading this at 6:30Am PST.


We've been busy at Bunny Hill! My line of Chelsa Manor fabric has made me into a wild designer! I've decided to introduce my mystery quilt in redwork too! Here's the sample of block number one. You'll find the directions here!


And finally my next basket block! The basket treats for February are two little birds and Valentine hearts! "Tweet" song of February! You'll find the pattern here!


Here's the redwork version...


You'll find the embroidery directions in the same file as the applique version. Just one file to download!


To see a wool version of block two, go to Cottons n' Wool. We both set our blogs to post at midnight (I hope).


So ready, set, go! February is a short month!


Hugs,


Oh, and please be patient with our web site. We're working on solving any problems. Keep trying because I have a feeling it has to do with traffic on the free pattern page. ( :

Tuesday, February 3, 2009

Perfect Harmony of Thread, Needle and Machine

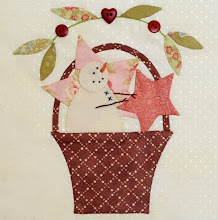
Block #2 of A Tisket, A Tasket is still a day away. I'll post a new block on the 5th of each month. I promise, on Thursday morning you'll find it on my web site! Little treats in the basket, just waiting for you!

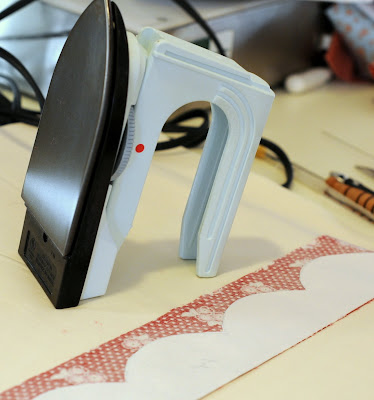
Most of you know we've been working away on my newest redwork quilt. Over the weekend I finished the scallop border using invisible machine applique. That's right, invisible machine applique, but with DMC Machine Embroidery thread!

I love to stitch by hand, but there's a time and a place for everything. Machine applique can be the perfect solution when you need to get it done fast. The four border scallops took me one evening to applique and you can hardly see any difference. I'll let you in on some of my secrets!

You need a few things to start with:

1. DMC Machine Embroidery Thread to match the color of your applique. Use a 50 wt. DMC thread on the top, and regular thread in the bobbin. (If you have a problem with your tension, try using the DMC in BOTH the bobbin and the top).

2. 70/10 Microtex machine needle

3. Roxanne's Glue-Baste-It

4. Sewing machine with a variable overlock stitch, hem stitch OR even a blanket stitch.

5. A knowledge of the Spray Starch Method of Applique (you can buy the applique techniques DVD, by Pearl Pereira on my web site. Pearl takes you step by step through spray starch applique and I guarantee you'll watch this DVD over and over!)

Now, prepare your applique using the spray starch method.

Glue-baste your prepared applique to background fabric. (Use a tiny line of glue next to the applique edge. You don't want the applique to move while you are stitching.)

And now we're ready to sew!

  1. Set your machine in the Needle down position.
  2. If you have a Bernina, choose the variable overlock stitch & mirror image the stitch. For other machines try the hem stitch or the blanket stitch.
  3. Stitch width at .5 to .7 (very tiny)
  4. Stitch length at .5 to .7
  5. Open toe foot & open stitch plate
  6. A good light and a great pair of glasses ( :


See the picture below? I'm stitching right next to the edge of my scallop. The foot is my guide and I make sure it is always RIGHT next to my fabric.

I'm stitching into the background fabric, and just barely catching the applique fabric. The machine takes a tiny "bite" of my fabric every few stitches . It's just like hand applique, you want a tiny, tiny stitch.

If you stay right next to the edge of the fabric, and I mean RIGHT NEXT to the edge, your background stitches will hardly show. Just look at the photo below! Remember I'm stitching in red thread!


And a view from the front of the scallop...


And how it looks on the back of the fabric...you don't ever want to rip out these tiny stitches so be careful!


I don't use invisible nylon thread. I don't like the feel or how it sews. My preference is the DMC. The cotton is soft, and blends right into the fabric. It's wonderful to sew with and just feels good!


And many years from now when someone picks up my redwork quilt, I know the cotton thread will still be feeling good!


The settings for each machine will vary so you have to practice to see what works on your machine. Questions? I'll try and answer as they come up.

My redwork quilt is off to the quilter tomorrow and I'll be back on Thursday with a new basket block for you!

Hugs,